
Name a duo more iconic than red and green for the holidays — we’ll wait. While we see them virtually everywhere this season, from crimson ribbons on wreaths to sparkly shamrock hats donned by garden gnomes, one thing’s for sure: These festive hues are seriously underrated on the peepers.
You might be thinking, red and green? An intensely atrocious statement pair that takes a whole lot of guts to pull off — together or alone — in our makeup look?! We too struggle with switching out our everyday neutrals for these vibrant ’80s-esque hues. That’s why we’ve taken the liberty of putting together a step-by-step guide featuring these complementary shades for four totally wearable looks to get you amped up for Christmas.


4 different ways to pull off red and green for the festive season
Whether you’re looking to ace your eye game with a glittery eye this year or a subtle smokey eye, here are four ways to pull off red and green with pride — as shared by the Daily Vanity team!
Related:
-
Beginner’s guide: 4 easy-to-do looks for a glamorous holiday season
-
Trend alert: Milk tea eyeshadow is our current obsession and here’s how you can achieve the look
#1: Jingle Bell Rock
For the first look, we’ll be wearing festive colours in a classic smokey eye — but with a twist. Instead of going in with a scarlet shade, this daytime look will contain subtler ambers on the top lid, just strong enough to bring out a star-quality glamour, finished with a heavy pine green on the lower lash line for a stunning finish.
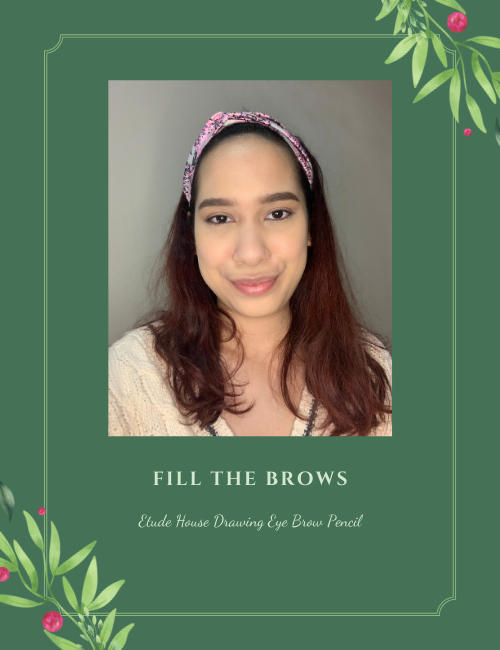
Step 1: Fill in the brows as desired. This pencil from Etude House is so easy to use and has a triangular shape, so you can go for thin and thick strokes — super versatile. It also comes with a spoolie to brush out the hairs for a natural, fluffy brow.
Step 2: Apply an eyeshadow primer to your lids. I tap it on with my fingertips to ensure it packs well so that the eyeshadow can stay on all through the night.
TIP! After this, apply a skin-coloured eyeshadow shade or loose setting powder all over the lid to seal in the primer.

Step 3: Next, using your finger again, swipe on a metallic gold shade and focus it on the middle of your lids. This gives the look a good pop and a good contrast against the green to be buffed on later.

Step 4: Using a tapered blending brush, apply a light warm-toned brown shade just in the crease to add a little depth and definition. A matte shadow works best. Psst, this one from the Tati Beauty palette is sooo buttery, I’d recommend it to anyone considering it.
Scroll down for the complete list of products used!

Step 5: Using the same brush, apply a medium warm-toned orange shade very lightly in the crease, focusing on the outer corner as well. This will bring some warmth to the otherwise cold look. Go back in again as needed, until the outer corner has just enough of that warm orange hue.

Step 6: Using a pencil brush, apply a deep brown shade that’s neutral only on the outers of your eyes — this helps to define them. Be sure to blend well, and when done, use a clean blending brush and swipe it over the crease to ensure no harsh lines remain. Apply a tad more of the gold shade to the centre of your lids.

Step 7: Next, with a smoky shader brush, take a deep green shade and swipe it beneath your lash line.

TIP! Now, it might seem scary working with colours under the eye, but the key is to take your time with it. You don’t want it to be too blended out else it’ll look like dark eye circles of sorts.
Step 8: Highlight your inner corners and the brow bone with the same gold glitter used in the beginning. You can do this with an angled brush or a pencil brush.

Step 9: Finish off the look by tightlining and waterlining your eyes with a black eyeliner pencil. Then apply mascara to both the top and bottom lashes for the extra glam.

Step 10: Add blush and a nude lip (or a dark one if you’re feeling bold) and violà, you’re all set!

Products used in this look:
- Supergoop! Glowscreen Sunscreen Primer — S$55 (50ml), Sephora
- Tarte Shape Tape ContourConcealer — S$42, Sephora
- By Terry Hyaluronic Hydra-Powder Face Powder — S$89, Sephora
- Etude House Drawing Eye Brow Pencil — S$5.90, Shopee
- Urban Decay Eyeshadow Primer Potion — S$35 (10ml), Sephora
- Tati Beauty Textured Neutrals Vol.1 Palette — S$84, Coma Makeup
- Urban Decay Full Spectrum Palette (currently unavailable, another great choice would be Fenty Beauty Money Snap Shadows — S$39, Sephora)
- Benefit Cosmetics BADgal Bang! Pencil Eyeliner — S$35, Sephora
- Benefit Cosmetics BADgal Bang! Mascara — S$44, Sephora
- Charlotte Tilbury Airbrush Bronzer — S$86, Sephora
- Hourglass Ambient Lighting Blush — S$67, Sephora
- Sephora Cream Lip Stain in 25 — S$20, Sephora
- Clarins Fix’ Make-up — S$45, Clarins
#2: Sultry Fuchsia
You can’t go wrong with fuchsia makeup for the holidays. Cop this sultry eye that adds the perfect seasonal sparkle, balanced out with a muted green under-eye. You really don’t need to add anything else to get right into party mode.
Step 1: Before starting on the eyes, fill in your brows with your favourite brow products to frame the face and accentuate the eyes!

Step 2: To start off, take a light transition shade to your eye sockets and deepen it, blending out as far as you’d like. Pick a colour that best suits your skin tone — used here is an orange-brown shade.
TIP! Avoid patting on too much for a base layer as you’ll definitely want to build up colour afterwards. The key is to keep it soft and diffused.

Step 3: Then, take a bright red shade and apply it all over the lid. After which, use the previous transition shade and blend the red shade into the transition shade.

Step 4: Taking a deep brown shade, lightly deepen the outer corners of your eyes to further define. This will give your peepers some dimension instead of just a simple wash of colour.
Then, bring a matte green shade under your lower lash line and start buffing it on in soft strokes.

TIP! Use a flat brush to achieve a more precise look under the eyes.
Step 5: To end off the look with glitter and finesse, top up the previous matte green shade with a green shimmer shade, and a champagne shade to highlight the top of your lids and inner corners.

Step 6: Last but not least, add a little bronzer to warm up the complexion and raise those cheekbones sky-high. Don’t forget to line the eyes too!

Products used in this look:
- Stila One Step Correct Serum Primer — S$56, Sephora
- Benefit Cosmetics The Porefessional Face Primer — S$56, Sephora
- Catrice HD Liquid Coverage Precision Concealer — S$6.90, Guardian
- Sunplay Skin Aqua Tone Up UV Essence — S$27.90, Watsons
- Maybelline Brow Pencil — S$11, Lookfantastic
- ColourPop x Kathleen Lights So Jaded Eyeshadow Palette — S$63, Shopee (another great choice would be BH Cosmetics’ Take Me to Ibiza 35 Color Shadow Palette — ~S$27, BH Cosmetics)
- Abduct Cosmetics Velvet Veil Setting Powder — S$32, Abduct Cosmetics
- KVD Vegan Beauty Tattoo Liner Liquid Eyeliner — S$32, Sephora
- Urban Decay Eyeshadow Primer Potion — S$35 (10ml), Sephora
- Benefit Cosmetics Hoola Matte Bronzer — S$53, Sephora
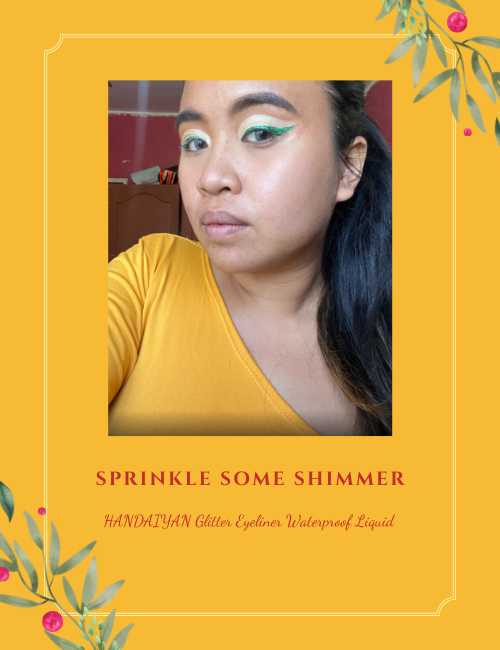
#3: Glittery Glam
Love glitter? Great, here’s an adventurous look you’re bound to fall head over heels with this season. Pair a dazzling green eye liner with just a dab of Indian red, topped with show-stopping champagne hues for the ultimate holiday glow. This one’s definitely for the bold.
Step 1: As usual, get your brows on fleek to divert all attention to your eyes.
TIP! If you’re looking to keep your makeup fresh all through the night, a simple trick is to use a bit of brow gel to keep your hairs brushed up and in place.

Step 2: Next, prime your eyelids! To prevent patchiness or fading, especially when going for heavy-toned looks, be sure to prime your lids with either an eye primer or a good ol’ concealer — whichever works better for you.

Step 3: To begin, pat on a matte brown transition shade just below the brow bone, starting a little higher up than the natural crease. This helps create the illusion of a thicker crease, providing more space to play around.

Step 4: “Cut”, or in other words, define your crease by dabbing on a thin layer of concealer just within the eye socket area. Then buff on a champagne shimmer shade.

For the uninitiated, a cut crease is a method of adding more depth and dimension to the eyes, most commonly by applying concealer all over the crease. First appearing in the ’60s, this technique opens up the peepers dramatically for a doe-eyed effect and has recently made a major comeback in the last decade.
However, this makeup trick’s definitely one of the more challenging ones out there — in particular, for us Asians who typically have smaller lid space. Luckily, we’ve got a tried-and-tested hack that helps you master the cut crease in under 25 seconds.
Scroll down for more!
Step 5: Add a shimmer green winged liner. Be sure to trace the shape of the shadow created for a more cohesive look.
Step 6: Finish off the look with base makeup and add a pinky-red matte shade on your lower lash line. Darken your lashes and swipe on a red lip for the ultimate party get-up.

Pro-tips for a cut crease
#1: A trick to demarcating your crease
Let’s be honest, not many Asians have been blessed with sexy, deep-set eyes, which often leads to a separate set of challenges when applying concealer to the crease in order to “cut” it.
One being the difficulty in identifying where the crease starts and ends.
But one of our writers, Sheobi, shares her method that might come in handy. She explains, using a flat brush to tilt your head upwards while keeping eyes looking straight forward, dab on a bit of concealer right in the middle of the lid, just above your upper lash line. Then, open your eyes and look up.
This should taint the upper section of your eyelid, making the perfect stencil to fill the rest of your crease in. Use your fingers to pat in the concealer, it should stay better on the lids this way!
#2: You don’t need to do a full lid cut crease
It might be hard to decide when to end the cut crease but Sheobi says it’s perfectly fine to do just a half-cut crease for this shimmer eye look — given that much of the concealer will be, ironically, concealed by the green glitter liner.
#3: Spray with setting spray instead of setting
Another tip she shared was to skip the setting powder immediately following a cut crease as not only might this result in a cakey look, but too much powder could also cause the colours applied after to ‘crack’ and appear fragmented.
Instead, to keep the hues in place, she suggests to spray a brush with setting spray before picking up the pigments to be patted on. This helps the colours pop better especially on hooded eyes, while ensuring the shadows remain intact.
Products used in this look:
- SACE LADY Tinted Brow Gel in Black Brown — S$2.21, Shopee
- LA Girl Pro Conceal HD Concealer in Warm Honey — S$6.25, Shopee
- Morphe 35M Boss Mood Artistry Palette — S$50, Shopee
- HANDAIYAN Glitter Eyeliner Waterproof Liquid — S$2.01, Shopee
- Maybelline Hypercurl Mascara — S$17.90, Watsons
- L’oréal Infallible Freshwear foundation in 260 — S$20, LookFantastic
- E.L.F Hydrating Camo Concealer in Medium Warm — S$15.90, Shopee
- WET N WILD Photo Focus Loose Setting Powder in Banana — S$7.77, iHerb
- Benefit Cheekleaders Bronze Squad Cheek Palette — S$105, Sephora
- Colourette Easy Matte in Quickie — 349 PHP (~S$9.66), online
- Essence Pure Nude Highlighter — S$10.90, Lazada
#4: Holly Jolly Christmas
We’re cosplaying a little this Christmas with a stunning halo eye makeup look that spotlights the gaze with strategically placed shadows. Although this technique might be a little tricky and time-consuming, it awards handsomely with a timeless pair of gilded eyes that’d render anyone the perfect tree topping angel.
Step 1: You know the drill. For this look, go for a soft, natural brow to ensure that your star-lit eyes remain the focal point.
Step 2: Never skip the primer — this important step could make or break a colourful eye. We’re loving the Urban Decay Eyeshadow Primer Potion in particular which has become the go-to primer for many in the team.
More about our top picks below!

Step 3: Take a neutral brown shadow and buff it all over the lid as a starting transition shade. It’s best to go with a matte as more textures will be layered on later.

Step 4: Next, dab on an amber or muted red hue to the centre of the lids. Since this will be a halo eye, it’s important to pack enough shadow right in the middle of the lid in order for the vibrant colour to peak through.
Feel free to experiment with a metallic eyeshadow for a extra glittery festive look — after all, it’s only Christmas once a year!
TIP! Don’t be afraid to use your fingers for better precision!

Step 5: Then, pick up a green shade and buff it into both the inner and outer corners of the eyes. If you’re just starting out, use an angled brush to create a sharp ‘V’ at the outer corners before blending it out.
You’ll be left with eyes snatched for days.

Step 6: Go back in with the same transition shade to blend out the top edges of the red and green duo. The idea is to layer on the brown to create a diffused look with no harsh lines. Bring the brush just below the brow bone to widen the eyes.

Step 7: Time for highlight! Pat an iridescent gold shade on the inner corners of the eyes and brow bone to seal in the look.
TIP! Dust the same gold shadow onto the high points of your face for a dazzling finish.

Step 8: Line your eyes and throw on a pair of falsies if you’re feeling it.

Step 9: Follow up with any base makeup as desired and spruce up your lips with a subtle pink lipstick.

Products used in this look:
- Hourglass Vanish Airbrush Concealer — S$58, Sephora
- Clé De Peau Beauté Cushion Foundation — S$130, TANGS
- Excel Powder & Pencil Eyebrow — S$25.90, Watsons
- Urban Decay Eyeshadow Primer Potion — S$35 (10ml), Sephora
- Urban Decay Naked Heat Eyeshadow Palette — S$83, Sephora
- Too Faced Chocolate Gold Eye Shadow Palette — S76, Sephora
- Kate Tokyo Super Sharp Liner — S$15.10, Watsons
- Mlen Magnetic Lashes — S$88, Shopee
- Tarte Amazonian Clay Blush — S$48, Sephora
- innisfree Vivid Cotton Stick in shade 4 — S$18, innisfree
- innisfree No Sebum Mineral Powder — S$10, innisfree
Top Picks from DV
Here are some all-time-favourite picks of the Daily Vanity team, tried-and-tested for the looks above!
Supergoop! Glowscreen Broad Spectrum Sunscreen Primer

Besides lending major sun protection with its SPF 40 formula, this multi-tasking makeup-gripping primer leaves a soft, dewy finish — just as its name suggests. Retails for S$55 (50ml), at Sephora.
L’Oréal Infallible 24hr Freshwear Liquid Foundation

Delivers a full, flawless coverage that blends seamlessly into skin for a breathable, skin-like finish. This foundation is waterproof and transfer-resistant, promising to last up to 24 hours! Retails for S$20, at leading drugstores and LookFantastic.
By Terry Hyaluronic Hydra-Powder Face Powder
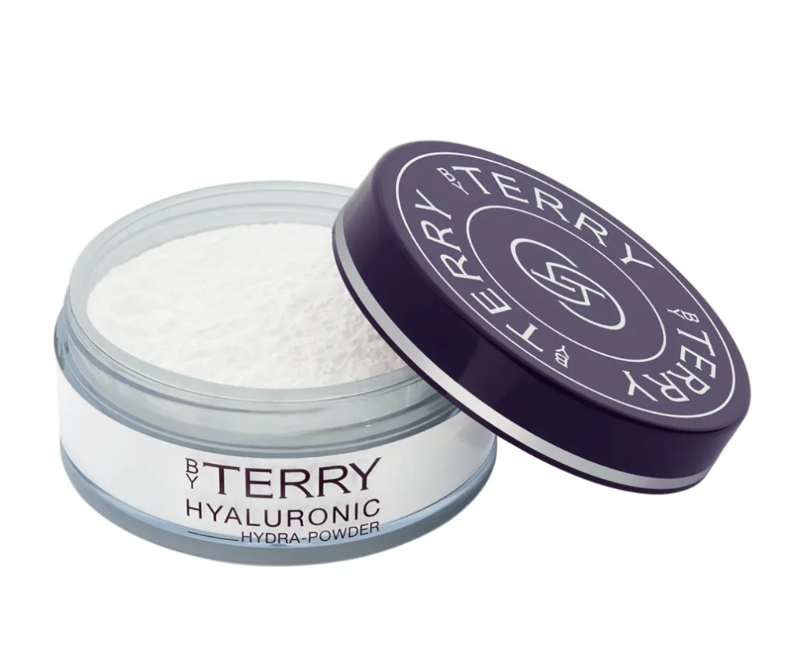
This translucent setting powder’s one of our faves due to its instant mattifying and blurring effects that help control shine for longer-lasting makeup. It’s smooth, super lightweight, and doesn’t crack on us to expose fine lines and imperfections — perfect for the under eye area. Retails for S$89, at Sephora.
Etude House Drawing Eye Brow Pencil

A double-ended automatic eyebrow pencil that lends waterproof and smudge-proof strokes in five flattering shades. No sharpening needed as its pressed powder stick stays in shape for various types of lines that suit your look. Retails for S$5.90, at ETUDE House.
Urban Decay Eyeshadow Primer Potion

Another product well-loved for its 24-hour crease-free, priming power that smoothens out the eyelid for effortless and precise application every time. Wondering why eye makeup seems so tough? This worthy investment might just be what you’re missing after all! Retails for S$35 (10ml), at Urban Decay stores and Sephora.
Benefit Cosmetics BADgal Bang! Mascara

If you’re on the search for full, dramatic lashes, look no further. Blast your peepers with a weightless coat of matte-black that look natural from every angle. Retails for S$44, at Sephora.
innisfree No Sebum Mineral Powder

Suitable as a setting powder, sebum-control powder, and a replacement for oil control paper, this product contains jeju minerals and mint ingredients that help keep skin soft and fresh all day. Retails for S$10, at innisfree.
Huda Beauty’s Matte Liquid Lipstick in Trendsetter

For a nude lip with the perfect touch of terracotta, give this gorgeous long-wearing liquid lipstick a try! Infused with antioxidants and hydrating complexes, you can rest assured your pluckers stay moisturised under the mask. Retails for S$32, at Sephora.


