

Smokey eyes are one of the looks that intimidate most makeup-wearers but even more so if you have monolids or hooded eyelids – two of the most common eye shapes that you see in Asians, in particular for those of Chinese descent.
But here’s the good news if you’ve been wondering if you’d be able to pull off smokey eyes on monolids especially if you’re a makeup rookie – it is definitely possible to do so.
]Smokey eyes can look just as good on monolids and hooded eyelids just as they do on other eye shapes.
If you’re ready to learn the basics, read on for the step-by-step guide that we picked up from YouTuber Claire Marshall. We’ve broken it down into eight simple steps that any beginner can pick up!
- Step 1: Create a Base
- Step 2: Define Your Eye Sockets
- Step 3: Darken the Outer Corner of Your Eyes
- Step 4: Highlight the Centre of Your Eyes
- Step 5: Redefine the Outer Corners of Eyes
- Step 6: Apply Eyeshadow on the Lower Lash Line
- Step 7: Line Your Eyes
- Step 8: Apply Mascara
- Video Tutorial to Learn How to Create Smokey Eyes on Monolids for Beginners
- Other Tips to Help You Pull Off Smokey Eyes
Step 1: Create a Base

Use a cream shade to create a base on the eyelids so that the subsequent eyeshadows applied can show up better.
Apply this over the entire eyelid and all the way up to the brow bone. Don’t forget the area under your lower lash line too, because you’re also going to be applying eyeshadow along your lower lash line later.
This step is especially important if you’re using matte eyeshadows for your smokey eye look, which – if you ask us – is probably easier to pull off for beginners than glittery smokey eye looks.
DV Tip: You can do this step either by using a nude shade you have in your palette that’s closest to your skin tone or apply an eyeshadow primer instead. Using an eyeshadow primer is recommended especially if you have oily eyelids because it also helps prevent your eyeshadow from creasing or caking as your eyelids oil up during the day.
Step 2: Define Your Eye Sockets

Those with monolids and hooded eyelids tend to have less obvious eye sockets compared to those with deep-set eyes. Defining your eye sockets help to create a more prominent smokey eye look and at the same time, guide your application so you know where you should apply your eye makeup till later on.
This also creates a layered effect so your smokey eye look wouldn’t appear too “flat”.
For this step, simply pick a medium shade (think of it as a contouring shadow) using a brush. Apply it by going back and forth along the area under your brow bone that’s sunken in.

How your eyelids should do after this step is done.
While this is an important step in creating smokey eyes especially if you have monolids or hooded eyelids, the good thing is that you don’t really need to be very precise with this step because it simply acts as a contouring effect to guide the rest of your makeup later.
You can simply use a fuller, fluffy brush (instead of a thin-tipped one) and don’t have to be too focused on blending.
Step 3: Darken the Outer Corner of Your Eyes

Here’s come the heart of this smokey eye tutorial – the “smoking” step.
Using a darker brown shade picked up with a thinner brush, go to the outer corner of your eyes. Then, create a “V-shape” starting with the area just under the socket lines you’ve just created in Step 2.

This may be an intimidating step for beginners; the tip is to go in with a lighter hand first and then slowly build up the intensity of the colour to the point when you’re satisfied with it.

This is how your eyelids should look after this step.
Apply the eyeshadow by going back and forth with your brush, creating a V-shape. The colour should look darkest on the outermost end of the V-shape and gradually go lighter as in goes in towards the centre of your eyes. Leave the centre of your eyes largely untouched.
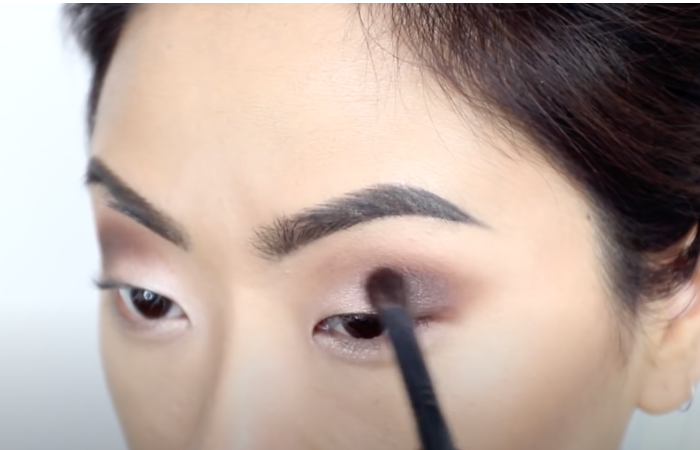
Step 4: Highlight the Centre of Your Eyes

Add a highlighting shade to the centre of your eyes in a patting motion. Avoid going to the outer corner of your eyes that you’ve just worked on in the previous step.
This step creates a “negative space” effect that will highlight the smokiness of the outer corner of the eyes, which is pretty much the star of the show.
For a more intensive highlight, you can consider wetting your brush with a spray before picking up the highlight colour so that the colour look bolder.
And if you’re feeling adventurous, this is the step where you can introduce a glittery or shimmery shade.
Step 5: Redefine the Outer Corners of Eyes

The previous step may mess up the definition of the outer corners inevitably.
So, using the same shade (or a slightly darker shade) you’ve used in Step 3, redefine the outer corners of your eyes by simply sweeping your brush along the V-shape, blending it out and building the intensity till you’re happy with the result.
Step 6: Apply Eyeshadow on the Lower Lash Line

For a strong look like this, you’re going to look a little “unbalanced” if you don’t apply eyeshadow on your lower lash line too. That’s because you’ll look too “top-heavy” with all the drama happening on your upper eyelids!
Sweep the same colours you’ve used to define the outer corners of your eyes along your lower lash line. Apply it such that you leave out approximately one-third of the area that’s closest to the inner corners of your eyes.
Take note that the gradient should look darkest towards the outer corners of your eyes.
Step 7: Line Your Eyes

Lining your eyes help pull everything together and frame the shape of your eyes.
You can line your eyes using a conventional eyeliner or, if you prefer a softer look, use an eyeshadow instead.
If you’d like to use your eyeshadow, wet an angled eyeliner brush with a spray so the pigment looks more intense and becomes more blendable, then press (not drag) the colour on along your lash line, starting from the outer corner of your eyes, working your way in.

Make sure you get the eyeliner as close to your lash line as possible for a more intense smokey eye look.
Don’t forget to line your lower lash line too.
You can choose to use a black or dark grey eyeshadow, depending on the look you prefer. The latter will give a more subtle look.
DV Tip: Just like in step 3, consider picking out a smaller amount of pigment and then slowly build it up till you reach the intensity you like. This ensures you can salvage any mistakes you make – remember, it’s always easier to add more intensity than to reduce intensity after you’ve applied it.
By the way, we have a guide to show you how to draw winged eyeliner that you might find useful.
Step 8: Apply Mascara

Curl your lashes and then apply mascara on both your top and bottom lashes to complete the look.
And if you prefer a more dramatic look, you can consider false lashes.
Video Tutorial to Learn How to Create Smokey Eyes on Monolids for Beginners
Here’s the final look:

If you’d like to see it done on video, check out this tutorial:
https://www.youtube.com/watch?v=2edvt_vtHE4
Other Tips to Help You Pull Off Smokey Eyes
- Pick out colours that flatter your complexion
- Practice makes perfect. Try doing it on a day you’re not rushing anywhere instead of when you’re just about to rush out to an important appointment
- Always go with a lighter hand and then build up its intensity. This helps make it less intimidating for beginners and you can still salvage it if you make a mistake
- Don’t stress over it! At the end of it, it’s just makeup! If you mess up, simply remove it with makeup remover and start again.
